How to Adjust Solar Panels for Seasonal Changes
Adjust your solar panels twice yearly using simple latitude-based tilt changes to boost output 10–25%, improve snow shedding, and save on energy costs.

Adjusting your solar panels twice a year can boost energy production by 10–25% without additional hardware. Here's what you need to know:
- Why Adjust? The sun's position changes throughout the year. Panels perform best when sunlight hits them directly (90° angle). Misalignment reduces efficiency - by 13.4% at 30° and 50% at 60°.
- Seasonal Angles: Use your latitude as a guide. Subtract 15° in summer for a flatter angle; add 15° in winter for a steeper one. Example: Chicago (42° latitude) adjusts to 27° in summer and 57° in winter.
- Benefits: Increased energy output, reduced snow/debris buildup, and improved cost savings. Use a solar panel calculator to estimate your potential gains; for a 10,000 kWh system, a 10% increase saves ~improved cost savings. For a 10,000 kWh system, a 10% gain saves ~$150/year.50/year.
- Tools Needed: Adjustable brackets, angle finder, compass, safety gear, and basic hand tools.
- Steps: Inspect your setup, adjust tilt based on season, secure bolts, and test output.
For even greater efficiency, consider automatic tracking systems. Single-axis trackers increase output by 25–35%, while dual-axis trackers boost it by 35–45%. Regular maintenance, like cleaning and inspections, ensures optimal performance year-round.
Why Adjust Solar Panels Seasonally
How Sunlight Angles Affect Energy Production
The sun's position in the sky isn’t constant - it shifts throughout the year. During summer, it’s high overhead, while in winter, it barely rises above the horizon. This seasonal shift, about ±23.44°, is due to Earth’s axial tilt. These changes directly affect how much sunlight your solar panels can capture.
Here’s where the cosine law comes into play: the energy your panels absorb depends on the intensity of sunlight and the angle at which the rays hit the panel. If sunlight strikes at an angle instead of directly, the photons spread out over a larger area, reducing the energy that reaches the solar cells. This oblique angle can cause a noticeable drop in energy output.
Winter adds another hurdle. The sun’s lower position increases atmospheric scattering, which reduces light quality. Known as the Air Mass ratio, this longer atmospheric path weakens the sunlight available for conversion into electricity. Adjusting your panels to a steeper tilt during winter helps them face the midday sun more directly, minimizing these losses.
Misaligned panels can seriously impact performance. For example, energy output can drop by 13.4% at a 30° misalignment and up to 50% at a 60° misalignment. Over the 25-30 year lifespan of a solar system, these losses can add up to thousands of dollars in missed savings, impacting how much solar panels add value to your property. That’s why precise seasonal adjustments are essential for maximizing energy production.
Benefits of Higher Energy Output
The numbers make it clear: seasonal adjustments can significantly boost your system’s efficiency. Simply adjusting your panels twice a year - to match summer and winter angles - can increase annual energy production by 10-25%. Some systems see even larger gains compared to flat-mounted setups. For instance, a study in Phoenix, Arizona, found that tilting panels to a 30° angle delivered 14% more energy than flat-mounted systems.
The financial upside is just as compelling. Properly adjusted panels generate 15-40% more energy than poorly positioned ones, all without increasing your initial solar panel installation costs. For a typical residential system producing 10,000 kWh annually, a 10% improvement means an extra 1,000 kWh per year. At an average rate of $0.15/kWh, that’s $150 saved annually, or $4,500 over the system’s lifespan.
Geography plays a big role too. In higher-latitude areas (45°-60°), seasonal tilt adjustments can improve energy yield by 28-40% compared to flat-mounted systems. Even in mid-latitude regions (30°-45°), which include most of the continental U.S., seasonal adjustments can boost output by 18-28%.
Steeper winter tilts offer another bonus: they help snow and debris slide off more easily. Angles of 35° or more encourage natural cleaning, which is crucial because snow-covered panels generate little to no electricity. This self-cleaning feature can prevent production losses during winter storms.
"Even a few degrees off the mark can significantly reduce output over the 25-30 year lifespan of a solar installation." - Renogy Official
Beyond the financial and practical benefits, higher energy production translates to a greater reduction in your carbon footprint. By generating more clean energy, you offset more fossil fuel-based electricity. For those aiming to live more sustainably, seasonal adjustments are a simple yet effective way to maximize your solar system’s contribution to a greener future. Plus, the financial savings and increased efficiency set the stage for the adjustment techniques that follow.
Tools and Materials You'll Need
Equipment for Manual Adjustments
To get started, you'll need some essential tools and supplies. For mounting, look for adjustable hardware like tilt mount brackets and corner bracket mounts specifically designed for solar panels. Renogy offers options such as 28-inch brackets for around $30 and 50-inch brackets for about $60, accommodating panels ranging from 100W to 550W. BougeRV and ECO-WORTHY also provide similar choices, including multi-panel systems priced at approximately $130.
For securing these adjustments, gather stainless steel fasteners - bolts, wing nuts, washers, and spring washers are a must. Using stainless steel fasteners with aluminum brackets helps prevent galvanic corrosion, which could lead to structural issues. Add a thread-locking compound to your kit to keep fasteners secure despite wind or vibrations. High-quality brackets are tested to handle wind speeds over 90 mph when tilted and 120 mph when flat.
You'll also need tools for orientation, such as a compass adjusted for magnetic declination and a clinometer or angle finder app to achieve the right tilt angle. Online solar angle calculators, especially those tailored to zip codes, are great for finding the optimal angles. Lastly, ensure you have a sturdy ladder and basic hand tools like wrenches and insulated screwdrivers designed for electrical work.
Once you've gathered all the necessary tools, focus on safety protocols before beginning any installation or adjustment.
Safety Equipment and Precautions
Having the right tools is only part of the equation - proper safety equipment is equally critical. Recent data highlights that 65% of solar-related accidents could have been avoided with adequate safety measures. Start with a full-body harness attached to certified anchor points that can support at least 5,000 pounds per worker. Use lanyards or self-retracting lifelines (SRLs) and maintain continuous tie-off when moving across roof areas.
Electrical safety is paramount. Equip yourself with Class E hard hats, insulated gloves rated for at least 1,000V AC, and non-conductive safety boots with Electrical Hazard (EH) ratings. Remember, even small currents - like 75 milliamps across the heart - can be deadly, and a 120V shock can deliver 200 mA through the body. Before touching any electrical components, use a CAT-rated multimeter (typically CAT III 1,500V or CAT IV 600V) to confirm the system is de-energized. Always inspect your safety gear for wear and stop work immediately if wind speeds exceed 20 mph or lightning is in the area.
"Solar energy safety takes specific expertise, exacting safety standards, and hard work." - Fluke
Practical Tilt Angle of PV Panels: Adjusting for Seasonal Variations (Lesson 8)
Calculating the Right Tilt Angle for Each Season
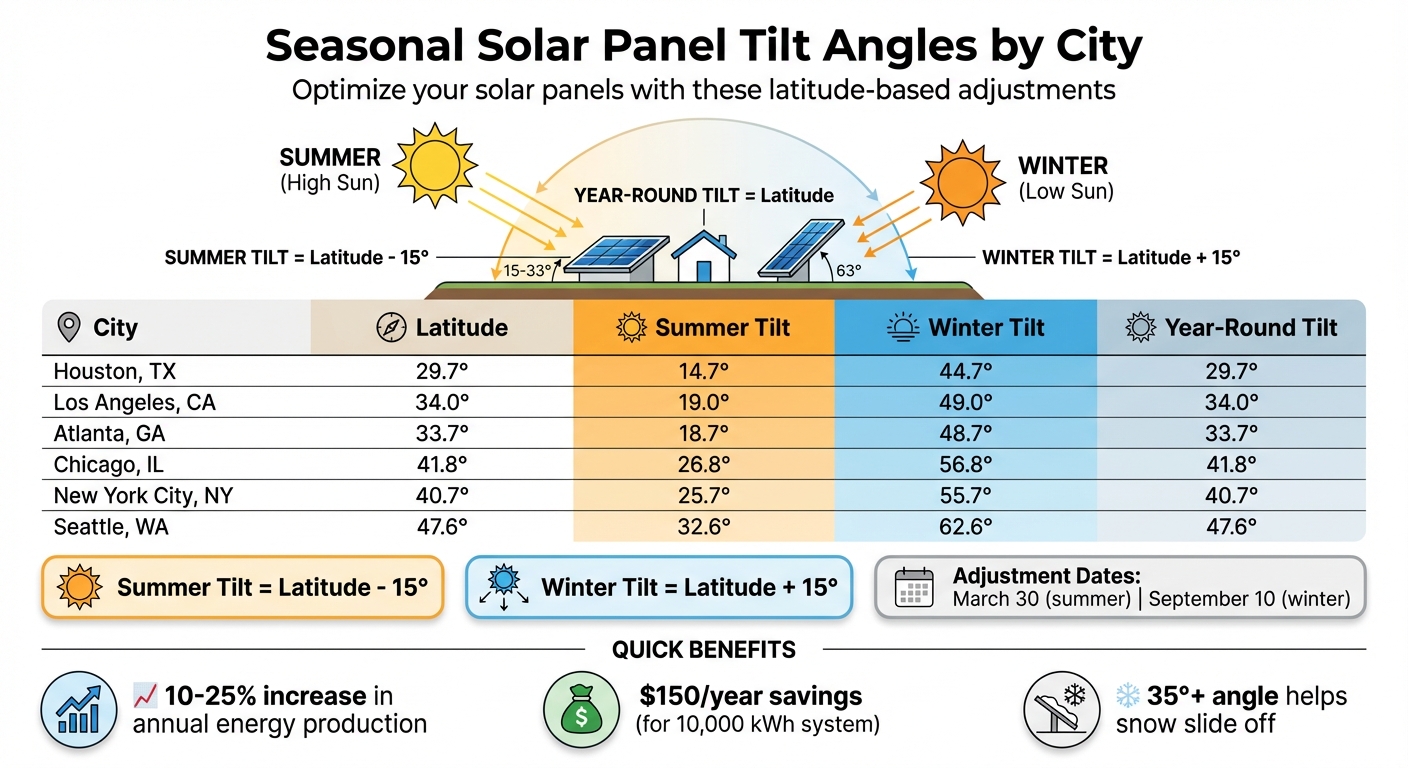
Solar Panel Seasonal Tilt Angle Guide by U.S. City
Using Latitude to Determine Tilt Angles
Your latitude serves as the starting point for setting the tilt of your solar panels. For fixed installations, the general rule is to set the tilt to match your latitude, then adjust by ±15° depending on the season. During summer, when the sun is higher in the sky, subtract 15° from your latitude for a flatter angle. In winter, when the sun stays lower, add 15° for a steeper tilt.
Take Chicago, for example, which sits at approximately 42° latitude. Using the seasonal adjustment rule, the summer tilt would be around 27° (42° – 15°), while the winter tilt would increase to about 57° (42° + 15°). This steeper winter angle also helps with snow shedding. In the Northern Hemisphere, the recommended dates for these adjustments are roughly March 30 for summer and September 10 for winter.
For mid-latitudes (between 25° and 50°), a more precise formula is often used:
- Summer Tilt = (Latitude × 0.93) – 21°
- Winter Tilt = (Latitude × 0.875) + 19.2°.
The table below shows how these adjustments apply to various U.S. cities.
Example: Seasonal Adjustments in the U.S.
| City | Latitude (Approx.) | Summer Tilt (Latitude – 15°) | Winter Tilt (Latitude + 15°) | Year-Round Tilt (Latitude) |
|---|---|---|---|---|
| Houston, TX | 29.7° | 14.7° | 44.7° | 29.7° |
| Los Angeles, CA | 34.0° | 19.0° | 49.0° | 34.0° |
| Atlanta, GA | 33.7° | 18.7° | 48.7° | 33.7° |
| Chicago, IL | 41.8° | 26.8° | 56.8° | 41.8° |
| New York City, NY | 40.7° | 25.7° | 55.7° | 40.7° |
| Seattle, WA | 47.6° | 32.6° | 62.6° | 47.6° |
Seasonal adjustments can increase your system's energy output by 3% to 7%, depending on your location. For example, at a latitude of around 40°, systems with seasonal tilt adjustments capture about 75.2% of the theoretical maximum energy output, compared to just 71.1% for fixed-tilt systems. Accurate tilt settings are essential for maximizing your yearly energy yield.
How to Adjust Your Solar Panels
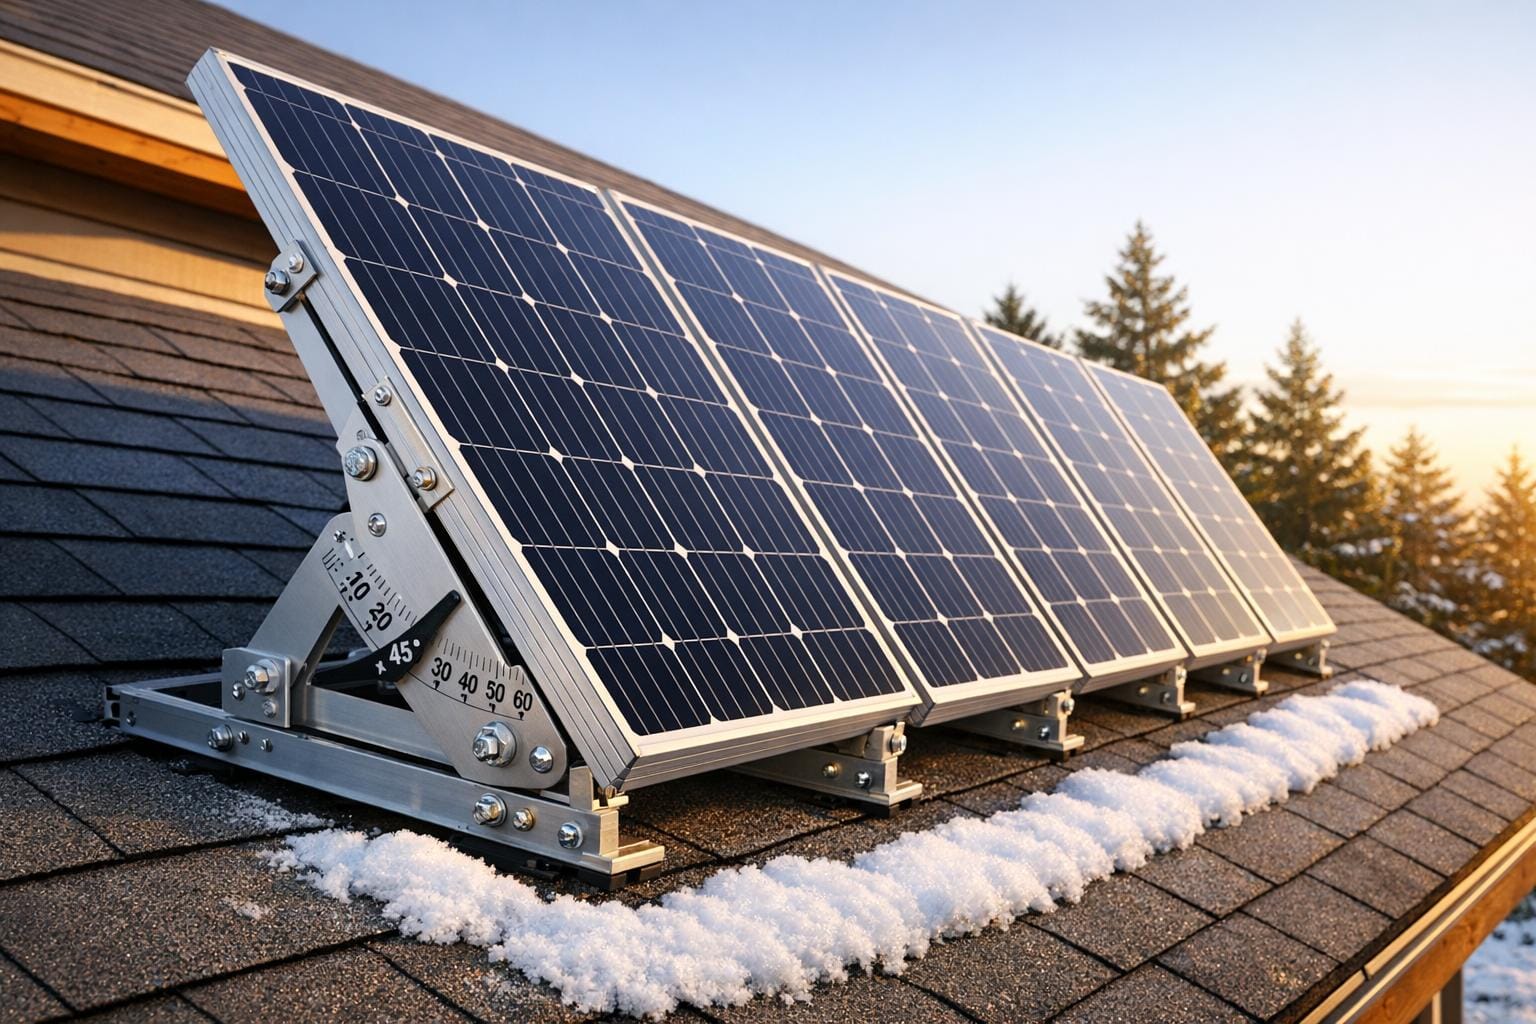
Step 1: Inspect Your Setup
To align your solar panels with the changing paths of the sun, start by inspecting your system. Proper tilt adjustments are key to maximizing energy efficiency. Check all brackets and bolts for any signs of wear or damage. If you have a ground-mounted system or adjustable pole mounts, these are much easier to modify compared to roof-mounted panels, which are usually fixed due to structural limitations. Gather the tools you'll need: a digital angle finder, a wrench set, and safety gear like fall-protection equipment. Plan to adjust your panels 2 to 4 times per year. A common schedule is twice annually - once in late March for summer and again in September or October for winter.
Step 2: Summer Adjustment (Flatter Angle)
From late spring through early fall, you’ll want to lower the tilt angle of your panels to capture the sun when it’s higher in the sky. Use the summer angle formula: Latitude − 15° or (Latitude × 0.9) − 23.5°. A digital angle finder will help you set the tilt precisely. For example, in Phoenix, Arizona, adjusting panels to a 30° angle during summer resulted in a 14% energy increase compared to flat-mounted systems. Once the angle is set, tighten the bolts securely. These seasonal tweaks can significantly boost your system’s energy output.
Step 3: Winter Adjustment (Steeper Angle)
When winter arrives, the sun sits lower in the sky, so increasing the tilt angle is essential. Add 15° to your latitude for a quick estimate, or use the formula: (Latitude × 0.9) + 29°. A steeper tilt not only improves energy capture but also helps snow slide off more easily, especially if the angle is 35° or greater. Aim to make these adjustments in early fall, around September 10, to prepare for the season ahead.
Step 4: Secure and Test
Once your panels are set to the new angle, make sure all bolts are firmly tightened to prevent any movement caused by wind. Use a declination-adjusted compass to confirm that the panels are facing True South. Afterward, check your inverter’s output - it should show an immediate improvement. Even a small difference in tilt, as little as 10°, can impact energy output by up to 6%. Properly securing and testing your setup ensures your panels will operate at peak efficiency until the next adjustment.
Automatic Tracking Systems
Seasonal manual adjustments can improve solar panel efficiency, but automatic tracking systems take it a step further by continuously optimizing panel positioning without human intervention. These systems rely on motors, sensors, and GPS data to adjust panel alignment throughout the day and year, ensuring maximum energy capture. By 2024, 99% of new utility-scale solar projects incorporated single-axis tracking, thanks to its affordability and reliability. The global solar tracker market reached 111 GW in 2024, reflecting a 20% year-over-year increase. Impressively, these systems only consume 1–5% of the energy they generate.
Single-Axis Trackers
Single-axis trackers operate by rotating along one horizontal axis to follow the sun's east-to-west movement. This design increases annual energy output by 25–35% compared to fixed panels. Their straightforward design and lower costs make them the go-to choice for utility-scale solar installations.
For residential systems, these trackers cost about $500–$1,000 per panel, while utility-scale setups range from $0.15–$0.25 per watt. For instance, a 4-kilowatt ground-mounted system with single-axis tracking costs around $22,125, compared to approximately $13,000 for a fixed-tilt system. Many modern trackers also include "stow" modes, which flatten the panels during high winds (35–45 mph) to prevent damage. For those seeking even higher efficiency, dual-axis trackers provide additional benefits.
Dual-Axis Trackers
Dual-axis trackers take optimization further by adjusting both horizontally (east–west) and vertically (north–south). This capability boosts energy production by 35–45% compared to fixed systems. A typical 3–5 kW residential system with dual-axis tracking can generate an additional 750 to 2,250 kWh annually.
"Dual-axis trackers produce 50–70% more power than rooftop solar or fixed ground-mount systems, and about 20–30% more than single-axis solar trackers." – Alazone Smith, Central Washington University
However, this added efficiency comes at a cost. Residential installations are priced at about $1,000–$1,500 per panel, while small commercial projects cost $0.40–$0.60 per watt. A 4-kilowatt system with dual-axis tracking typically costs around $29,625. These systems are particularly useful in areas with limited space or at higher latitudes, where the sun's angle changes significantly throughout the year. Keep in mind that maintenance for residential dual-axis systems runs about $200–$500 annually, covering quarterly sensor calibrations and lubrication of moving parts.
Maintenance After Adjustments
Once you've adjusted your solar panels for seasonal changes, keeping up with regular maintenance is crucial to ensure they operate efficiently. Skipping maintenance could cut your system's output by as much as 15%. A mix of cleaning, inspections, and monitoring helps catch small issues before they turn into expensive repairs, whether you have a professional setup or built your own solar panels. This routine care ensures your system continues to benefit from the adjustments you've made.
Cleaning and Inspection
How often you clean your panels depends on your surroundings. Panels in urban or suburban areas typically need cleaning every 3–6 months. In coastal regions, aim for every 2–4 months, while panels near trees or in desert climates might require cleaning as often as every 2–3 months.
For cleaning, stick to non-abrasive tools. A telescopic pole can help you reach safely, while a rubber-edged squeegee works well for removing water and preventing mineral spots. For dry debris, a leaf blower is a quick and effective option. Always clean your panels early in the morning or late in the evening to avoid thermal stress caused by cold water hitting hot glass. Extreme temperature differences can crack the glass, so be cautious.
Annual professional inspections, which cost between $150 and $350, are a smart investment. These checkups can uncover issues like cracked glass, loose wiring, or pest damage before they worsen. If repairs are needed, costs can range from $250 to $1,600, depending on the problem.
Checking for Shade and Obstructions
The sun's path changes throughout the year, which can affect shadow patterns on your panels. After making seasonal adjustments, take time to assess how shadows fall on your panels during different times of the day - morning, midday, and afternoon. Pay special attention during solstices and equinoxes to understand how the sun's shifting position impacts shading. For instance, trees that didn’t block sunlight in the summer might cast significant shadows in the winter when the sun is lower in the sky.
Conduct ground-level inspections twice a year, ideally in spring and autumn. Use binoculars to spot debris, bird nests, or new obstructions without climbing onto your roof. For precise shading data, tools like the Solar Pathfinder ($300–$500) can help. If you prefer even more accuracy, aerial analysis reports from services like EagleView provide detailed data for $50 to $200 per report, offering between 5,000 and 20,000 data points with a ±2–5% accuracy range.
To maintain optimal sunlight exposure, trim nearby trees and hedges at least twice a year. Seasonal growth can easily block sunlight and reduce your system’s output, undoing the benefits of your adjustments. Routine care like this ensures your panels stay unobstructed and perform at their best year-round.
Conclusion
Seasonal tilt adjustments are a straightforward way to get more out of your solar system. By making these changes twice a year, you can significantly increase your annual energy production, which means lower utility bills and a better overall return on your investment in renewable energy.
These adjustments also enhance system performance and reliability. For instance, GreenTech Industries reported a 22% increase in winter energy output and reached full ROI in just 14 months after implementing seasonal optimizations. Even if automation isn't an option, simple manual adjustments based on your local latitude can deliver noticeable benefits with minimal effort. These tweaks not only cut costs but also support a cleaner energy footprint.
If manual adjustments aren't practical, automated solutions like solar trackers can be a game-changer. Single-axis and dual-axis trackers can increase energy production by 25% to 45% compared to fixed systems. While roof-mounted systems often stick with fixed setups due to safety and structural considerations, ground-mounted systems are well-suited for either manual or automated adjustments.
Don't forget the importance of regular maintenance to sustain these improvements. Cleaning, inspections, and monitoring for shading issues are essential to keep your system running efficiently. Whether you choose manual adjustments or automated tracking, seasonal optimization helps maximize energy output, extend the life of your system, and improve your overall return on investment.
FAQs
Can I adjust roof-mounted panels, or is this only for ground mounts?
Yes, roof-mounted solar panels can indeed be adjusted, not just ground-mounted ones. While most roof panels are installed at a fixed angle that matches the pitch of the roof, some systems are designed to allow for seasonal or periodic adjustments. If your system includes this feature, tweaking the tilt can help maximize energy production throughout the year.
How can I determine my tilt angle if I don’t know my latitude?
Online solar panel angle calculators make it simple to find the best tilt for your panels. Many of these tools allow you to enter your location manually, or they can detect it automatically. Based on this, they suggest the ideal tilt angles tailored to your region and seasonal changes.
If you prefer a manual approach, you can adjust the tilt by using your latitude as a reference. For winter, increase the angle by about 15°, and for summer, decrease it by 15°. However, if you're unsure of your latitude or want the most precise results, these calculators are the easiest way to go.
When is seasonal tilt adjustment not worth the effort or risk?
Adjusting the tilt of solar panels seasonally might not always be the best choice, especially when the effort, cost, or potential safety risks outweigh the energy benefits. Fixed tilt systems, particularly those set to match the local latitude, can deliver almost optimal performance with little to no upkeep. In regions where seasonal sunlight variations are minor or where the energy gains from adjustments are minimal, the resources needed to make these changes may not be justified.
Related Blog Posts
Stop Overpaying for Electricity in 2026
Irish homeowners are saving thousands with the €2,400 SEAI grant and 0% VAT. Get 3 free quotes from vetted, SEAI-approved installers.
Your data is secure. We only share with top-rated SEAI-approved installers.